Restoring Perfection, The Art of Patching Damaged Drywall
Accidents happen, and when they do, our walls often bear the brunt of the damage. With the art of patching, you can restore your damaged drywall to its former state. Here, we will describe the techniques and tips for repairing damaged drywall, transforming flaws into seamless, flawless surfaces.
- Estimating the Damage: Before It is crucial to assess the extent and type of damage to your drywall before starting the project. Whether it’s a small hole from a doorknob or a larger crack, understanding the nature of the damage will help you define your approach. Small holes can often be fixed with a simple patch, while larger areas may require more extensive measures. By evaluating the damage, you can determine the best course of action and gather the necessary materials for a successful repair.
- Preparing the Surface: Proper preparation sets the foundation for a seamless patch. Begin by cleaning the damaged area, removing any loose debris or chipped paint. For small holes or cracks, use a putty knife to gently widen the damaged area, creating a smooth surface for the patching compound to adhere to. Sand the surrounding area to create a slightly rough texture, ensuring better adhesion. Once the surface is clean and prepped, wipe away any dust or residue, creating a clean canvas for your patching work.
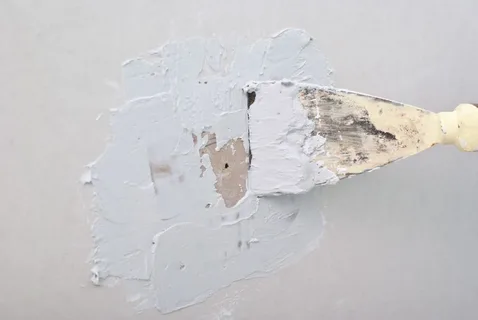
- Applying the Patching Compound: The key to a successful drywall repair lies in the application of the patching compound. Apply a thin layer of compound over the damaged area by a putty knife or trowel. For larger holes or cracks, use a self-adhesive mesh patch to provide additional support. Smooth out the compound, feathering the edges to blend it seamlessly with the surrounding wall. Allow the compound to dry according to the manufacturer’s instructions before starting the next step.
- Sanding, Priming, and Painting: Once the patching compound has dried, sand the repaired area with fine-grit sandpaper to ensure a smooth and even surface. Be careful not to use sand too much. It causes damage the surrounding wall. After sanding, wipe away any dust with a damp cloth. Apply a coat of primer to the patched area, allowing it to dry completely. Finally, paint over the repaired section, matching the color and texture of the existing wall. Multiple coats may be necessary to have a seamless blend between the patch and the surrounding wall.
The art of patching damaged drywall allows you to revive your walls and have a flawless appearance. By assessing the damage, preparing the surface, applying the patching compound with finesse, and finishing with sanding, priming, and painting, achieve a seamless and invisible repair will be possible So, fear no more the dents and holes, with the art of patching, you are able to revive the beauty of your walls easily.

Exploring Materials and Best Practices for Repairing Damaged Walls
Maintaining the structural integrity and aesthetic appeal of our living spaces is crucial for creating a comfortable and visually pleasing environment. Walls sustain damage from various factors such as accidents, wear and tear, or even natural disasters. When faced with damaged walls, the art of patching talks.
In this essay, we will explain the different materials are used for patching damaged walls and present the best operations to ensure effective repairs. Understanding the properties of these materials and employing the right techniques help you restore the walls to their former shape.
- Spackling Compound: Spackling compound, also known as wall putty or filler, is a versatile material used to repair small to medium-sized holes, cracks, and dents. It is a paste-like substance which applied easily and dries quickly. Spackling compound is available in various forms, including pre-mixed tubs or powdered formulas that require water for mixing. To use spackling compound, first you need to clean the damaged area and remove any loose debris or flaking paint. In the second step, apply the compound using a putty knife, filling the damaged area and smoothing it out. After drying, sand the patched area lightly to have a seamless finish. Finally, prime and paint the area to match the surrounding wall.
- Joint Compound: Joint compound also referred to as drywall mud or simply mud, is a gypsum-based material commonly used in larger repairs or for covering seams between drywall panels. It is available in powder form and needs to be mixed with water to achieve consistency. Joint compound are various in types, like lightweight, all-purpose, and setting compounds. For patching larger holes or repairing extensive damage, it needs to cut away any loose or damaged drywall material by using a utility knife. Then, apply a self-adhesive mesh patch over the hole or damaged area to stabilize it. After that, apply multiple thin coats of joint compound over the patch, feathering the edges outward to blend it with the surrounding wall. Sand the patched area between each coat to have a smooth finish. At the end, prime and paint the patched area to match the rest of the wall.
- Self-Adhesive Patching Tape: Self-adhesive patching tape is a quick and easy solution for repairing small to medium-sized holes and cracks. This tape is made of fiberglass or mesh that reinforces the damaged area and prevents future cracking. It is particularly useful for repairing drywall or plaster walls. To use self-adhesive patching tape, clean the damaged area and cut a piece of tape slightly larger than the hole or crack. Place the tape over the damaged area, pressing it firmly to ensure proper adhesion. Then, apply joint compound over the tape, feathering the edges outward. Sand the patched area until the compound dries. At the end, finish with primer and paint.
Patching damaged walls is an essential skill for maintaining the integrity and aesthetics of our living spaces. By understanding the different materials and employing the appropriate techniques, you can effectively repair a wide range of wall damage. Spackling compound is ideal for small to medium-sized repairs, while joint compound is suitable for larger repairs and seam coverage. Self-adhesive patching tape provides more reinforcement for both drywall and plaster walls. Remember to follow the recommended steps for each material, including cleaning the damaged area, applying the patching material, sanding, and finishing with primer and paint. Whether you’re a DIY enthusiast or seeking professional assistance, the art of patching allows you to restore your walls and transform damaged areas into seamless surfaces once again. If you investigate time and effort properly in this process, you can enjoy visually and structurally.


